Wednesday, January 4, 2012

Checking in on the natural starter and bread making

Previously (a long time ago!) I wrote about the wild yeast levain I was beginning to make following the instructions in the book 52 Loaves (also available here.) 

Well, I am happy to say that about a year and a half later I am still using this to bake really good bread!

One reason I wanted to make this from wild yeast instead of purchased yeasts is that the author of 52 Loaves claimed that it was more mild than the typical 'sourdough' flavor. I can definitely attest that this is true!

So, long after I meant to put this update, I can finally strongly recommend making your own wild yeast levain (from a local apple, if possible this time of year... otherwise maybe you'll have to wait until summer?) and baking with it!

I try to bake with it or at least feed it every week, though there have definitely been a couple that I've forgotten.  It's not that hard to keep going and it does make good tasting bread - cheaper than using so much store-bought yeast, too!

Here are some of the recipes I've tried with it:
- baguettes
- bagels (these are AMAZING)
- other bread recipe

And here are a couple of pictures of some of the bubbly starter, ready for baking, the formed loaves, ready to go in the oven (onto a pizza stone, and a pizza peel does make this MUCH easier), and the finished loaves below.  Happy baking!!


Saturday, September 3, 2011

Grilled Salmon with homemade tomato salsa


Trying not to let this blog completely die away... let me tell you about what we had for dinner tonight: Salmon fillet marinated in lime/garlic/jalapeno (baked, though it was supposed to be grilled, but lots of rain adjusted those plans) topped with homemade tomato salsa!

This is a perfect summer meal!

I'm feeling a little too lazy to get off the couch and give you exact measurements, besides, it's flexible, so here's how to make it:

Take 1-2 jalapenos and 5 cloves of garlic (UNpeeled) and heat in a dry skillet until black and blistered on the sides. Let cool. Peel the garlic, and stem the jalapeno. **Depending on how hot your jalapenos are, you may want to seed them, too. If we get them from the store, we usually leave the seeds in one of them at least, but today's were from the farmer's market and we suspected they would be hotter and so seeded both - it was still plenty hot for our 'medium' salsa-loving tastes.**

Using a blender, pulverize the garlic and jalapenos with 1/3 c. lime juice until completely liquid.

Put your salmon fillet (we used 1.3 lb for two people - the girls don't like it, which gave very generous servings and ~one serving left-over) in a greased glass pan (if you're going to bake it) or an ungreased glass pan if you're not baking it, and pour over some of the pulverized liquid to cover it with just a little. **Make sure you save the rest because it's what makes the salsa awesome!

Set the salmon aside to marinade for just a short time while you make the salsa.

Finely chop ~1/2 a red onion (we actually didn't have this and used a shallot instead this time, but usually make with the red onion) and rinse the onion in a strainer under running water. Let drain and add to salsa bowl. Then cut up as many tomatoes as you want - the more varieties and colors the better! We love it with some yellow cherry tomatoes (Lemon drop!) and some other red varieties. This is a great use for heirloom tomatoes and all sorts of new varieties from the farmer's market or your garden! I don't really know how many tomatoes to tell you... we maybe used ~5 smaller red tomatoes and ~3/4 pint of small yellow cherry tomatoes.

Mix, add salt to taste (takes more than you might guess ~3/4 t??), and chopped cilantro (how much looks good to you!).

Then, add in some of the pulverized garlic/pepper/lime juice mixture that was left over (not from the raw fish pan!!) Start with very little and taste - it can get hot quickly, depending on how hot your peppers were.

Cook the salmon on the grill (best option) or oven until done to your taste.

Serve with the homemade salsa piled on the salmon and with tortilla chips to eat up the rest of the salsa! (Like most fresh tomato salsas this one doesn't last very well beyond this first day, so don't make it ahead of time and be prepared to eat it all - not usually a problem in our house!)

We did try to take a picture, though because of the rain outside the light isn't the greatest. We also had biscuits and salads to round out the meal.

This is one of my favorite summer meals and is adapted from a Rick Bayless recipe from this book:
http://www.rickbayless.com/cookbooks/mexicooneplate.html


(side note: Aaron, have you been to his restaurant in Chicago??? I really want to go sometime!)

(another note: not my beer in the picture above! but I heard it was a good pairing - Leinnie's Sunset Wheat)

Friday, March 11, 2011

gpbj

Sometimes a girl just needs to eat something warm with minimal mess and effort...thank you grilled cheese sandwich. And like any true born and bred American, a large part of my diet revolves around peanut butter, and a large part of my time is spent thinking of new ways to incorporate peanut butter into my diet.
For a while now, I've been wanting to combine two of my favorite things-the warm toasty goodness of grilled cheese, and peanut butter. Although there are endless varieties of peanut butter sandwiches, the native voyage of my grilled peanut butter sandwich had be my classic, my favorite, my go to peanut butter sandwich...peanut butter and strawberry jam. I thought about it a lot in France, most of the key ingredients were available. France is home to delicious and cheap bread, butter that stands on its own (SO good you could eat it plain, not that I ever would...ahem), and jars of strawberry jam sold everywhere from huge supermarket chains to Sunday morning markets and all were amazing. The only thing missing was the peanut butter. Long before moving to France, I was introduced to French "peanut butter" by a David Sedaris story. This "peanut butter" is sold in a CAN, with a fat smiling kid on it, leading one to believe the French think peanut butter is something to be opened and eaten in one sitting. Mr. Sedaris did not fabricate anything. I saw those cans of peanut butter. I always meant to buy one, but I never did. I shouldn't judge something I've never eaten, but I knew that my grilled peanut butter sandwich could not be made using canned peanut butter.
Fast forward to Korea. Skippy PB (creamy or crunchy!) is widely available. However, the Korean butter is not so much creamy goodness, but rather more of an oily spread with an almost neon yellow color and the taste of slightly old dairy. And the bread is simply a flavorless vessel for whatever you want to put on it to get to your mouth. But my grilled peanut butter sandwich idea had waited long enough. So on my last trip to the grocery store, I got my ingredients. The next night, I buttered one side of the bread. I peanut buttered and jammed the other side. I buttered the top bread, and turned my stove down as low as it would go (and given the poor quality of my kitchen appliances, that is not actually low, but I've gotten quite good at balancing the pans mostly off the burner), put the lid on to ensure adequate peanut butter melting, and waited. And even with the less than mediocre Korean bread and butter, YUM! I am anxious to make it with good bread and actual butter. I am also anxious to expand and try a grilled peanut butter and banana, or peanut butter and honey, or peanut butter and pickle (my friend swears these are delicious).
I googled my sandwich, and found scores of recipes. My idea had been done before. I am not the culinary pioneer I thought I was. But that doesn't make me love it any less. I would have taken pictures, but it looked pretty unappetizing...and I'm lazy.

Monday, January 10, 2011

Vegetarian Black Bean Chili

YUM.

A friend made this for me last winter. I hate myself for what I'm about to type, but seriously: love at first bite. Cast-iron cornbread on the side and everything is right with the world.

The fact that the chili and cornbread go from ingredients to dinner in about half an hour only improves an already exciting weeknight. Obviously, this is chili - so add, subtract, substitute away.

Need
  • 2 oranges
  • 2 T olive oil
  • 2 c chopped onions
  • 4 cloves garlic, pressed/minced
  • 4 t chili powder
  • 4 t ground cumin
  • 2 t ground cinnamon
  • 3 15.5 oz cans seasoned black beans, rinsed and drained
  • 2 14.5 oz cans diced tomatoes in juice, not drained
  • Hot sauce, sour cream/yogurt, cilantro
  • Cornbread (Seriously. I don't mean to sound like something bad will happen if you don't have this with cornbread, but do you really want to take that chance?)

Do

Zest the oranges, then juice them.

Heat oil in heavy pan, then add the onions. Saute, don't brown, til soft, about 5 min.

Add spices, stir around to bloom and get the onions coated. Add the garlic, stir till fragrant.

Add the beans, tomatoes, and half the orange juice. Stir to combine.

Bring to a simmer and stir occasionally, for about 15 minutes.

Add additional orange juice, zest, hot sauce, salt, pepper.

Serve, topping with yogurt and cilantro. Cornbread goes on the side.

mmmmmm....

Sunday, December 19, 2010

Pumpkin Chocolate Chip Cookies

Ingredients
2 sticks softened butter
1 c. white sugar
1 c. brown sugar
1 - 15 oz can pumpkin
2 large eggs
3 c. flour
2 t. baking soda
1/2 t. salt
1 t. vanilla
1 t. cinnamon
1/2 t. ginger
1/4 t. nutmeg
1/4 t. cloves
2 c. milk chocolate chips

Directions
Heat oven to 350 and grease pans.
Using mixer, beat butter until smooth. Beat in sugars, then eggs, pumpkin, and vanilla.
In another bowl, mix together dry ingredients. Stir into wet dough in thirds. Stir in chocolate chips. Scoot onto cookie sheets in heaping tablespoons. Bake 18-20 minutes, or until brown around the edges.


Saturday, August 14, 2010

Grandma's 14-Day Sweet Pickles

I'll give an update on the wild yeast levain and the breads I've made with it soon but right now I have pickles on the brain, so I thought I'd share.

Raise your hand if you love Grandma's sweet pickles. Raise your hand if you used to eat them plain (while drinking Grandma's iced tea) in the summer time for a snack while visiting the farm. (ok, Laura and I might be the only ones raising our hands on that one.) And finally, raise your hand if you think that store-bought sweet pickles just can't compete.

I'll finally put my hand down now to type, but I love Grandma's Sweet Pickles with a passion and so long ago I asked her for her recipe. It's a photocopy from some magazine - not sure what one, but it's not exactly a family secret recipe or anything, but I still wanted to make sure I had her real recipe, for someday when she stopped making them (She did a few years ago. I guess at 80 she's allowed to 'retire!')

I was intimidated to try them for many years... 14-days! So much work! And I didn't have a "1-gallon" stone crock like the recipe called for - what would I use instead? Finally a good friend in Madison (Hi, Sarah!) who loves sweet pickles as much as I do and is fearless in the sewing room (anyone can make your own wedding dress, that's easy, but she made her husband's suit!) convinced me that I should really try them that they couldn't be that hard.

And she was right, they really aren't that bad. I went to a restaurant supply store in Madison and got a food-grade plastic bucket that works great for making pickles two weeks of the year and for holding Claire's toys the rest of the time. And except for 30-60 minutes the first day to wash the cucumbers and get things ready, an hour on Day 7 to cut the cucumbers, and around 2-3 hours on Day 14 to can them, the daily work is really only 10-15 min (and you don't do anything days 2, 4, and 6!

I had intentions of typing up the whole recipe for here, but looking it over, I realize that would be crazy. There's so much detail in the instructions that I wouldn't want to lose. I'll scan it into a PDF and if anyone wants it, just email me, send me a message on facebook, or leave your email address in the comments to this post.

If you love Grandma's pickles, there is only one way to get them now - make them yourself!

Friday, July 2, 2010

Making a wild yeast levain and a Book Review of 52 Loaves


http://www.amazon.com/52-Loaves-Relentless-Pursuit-Meaning/dp/1565125835


http://www.williamalexander.com/ (the author's blog - includes recipes)

I heard about this book on another blog and thought it sounded worth reading. It is! The book is a non-fiction story about the author's attempt to re-create the "perfect" loaf of bread that he ate ~10 years before our story starts. He decides to make at least one loaf of bread a week for a year to try to do this. He bakes bread in various places around the world and learns from bakers... and also grows his own wheat and makes his own clay oven.

Alexander is an entertaining writer, including lots of interesting facts and details about bread, many of which I didn't know even though I've been baking homemade bread for probably almost 20 years. But he never loses sight of the story part of it (part memior) and it is funny at times and generally hooks you into the story!

He convinced me that I needed to bake more with a sourdough starter (a levain). As he says on his website: "Levain, sourdough, starter...call it want you want — it is the secret to authentic, yeasty, artisan bread. San Francisco sourdough has, in a sense, given all sourdoughs a bad name, but most wild yeast starters are far milder and (to my palate) more pleasant as well."

This convinced me to try to make a levain with wild yeast. I also think San Francisco sourdough bread is a little too strong for my taste, and when I've made starter before I've always used purchased, commercial yeast, so I'm anxious to see what the wild yeast starter is like.

I've started mine! Alexander recommends using orchard apples (the 'haze' on them is the yeast) so I thought I'd have to wait until fall for apples to be ready. But when we were at the farm last weekend Grandpa asked if we wanted apples! His neighbor or friend had a tree with "sauce apples" that he was trying to get rid of. Mom and Grandpa went and picked some.

I used a lot for making applesauce, but I saved one whole apple cut up into 1" chunks and the peel of a second to put in 1 c. de-chlorinated water. It has been sitting, covered, on my counter for almost the full three days (I've been stirring it at least twice a day) and already it is bubbly and smells like apple cider (and a little like vinegar... hopefully that's okay). I start "feeding" it with flour tomororw, so I'll keep you posted on how that goes and how it is to bake with! If it works and makes tasty bread, I'd be happy to share some starter with you if you want some Brown County wild yeast levain. Or, you can make your own, so far it seems pretty easy!

Alexander really recommends you use a scale when you bake. While, as a scientist, I understand that sentiment, I'm not sure if we'll get one or not. It seems like it's just one more item that may not get used enough to justify taking up precious real estate in my kitchen. If we want to follow any of his recipes though, a scale might be needed. He only posts them in metric weights. (This includes his levain recipe...) A few tips about bread making from the book would likely make any bread recipe better, however. (Soon I will post a recipe for "One Hour Bread" - a non-levain using bread that is great for instant gratification. It's even faster than a bread machine!!)

If you're looking for a good summer reading book, find a copy of 52 Loaves soon! Read while eating homemade bread, for the best experience.

(Legal note: A library copy of this book was read. This is not a popular enough blog that authors and companies send free stuff to so that it will be written about and our vast audiences will rush out and buy book or item. The author of this blog post wishes to state that she has no conflicting interests, and will have no material gain from the sale of this book, the making of levains, or the purchase and use (or not) of a kitchen scale.)

Sunday, June 13, 2010

Roasted Red Pepper Chickpea Dip


As I was making this recipe today, I thought it would be a good one to share! This is just a great chickpea dip that's easy to make (less than 10 minutes total) and is good as an appetizer or afternoon snack at work.

Ingredients:

2 cans chick peas (garbanzo beans) (15 ounces), drained
  • 1 small jar roasted red peppers (6 ounces), drained well and coarsely chopped
  • 1/2 lemon, juiced
  • 2 cloves garlic, cracked away from peel
  • 4 stems fresh rosemary, leaves stripped from stems
  • Coarse salt and freshly ground black pepper
  • 2 tablespoons extra virgin olive oil (EVOO), eyeball it as you drizzle it into recipe
  • 1 package flat breads, Everything flavor
  • 1 pint grape tomatoes, rinsed
  • 1 zucchini, sliced into 1/4-inch disks
  • any other veggies or other dipping items - I like baby carrots and red pepper strips.

  • Combine chick peas, roasted red pepper, lemon juice, garlic, rosemary, salt and pepper in a food processor. Turn the processor on and stream in two tablespoons olive oil. Process until smooth.

    Monday, February 22, 2010

    Gingersnap cookies I

    Ever since Josie brought her amazing gingersnaps to our house several months ago I have been wanting to make them. They were so good!! Unfortunately, right around the time I asked her for the recipe she started being sick all the time due to a little one that Claire is getting excited to meet in June. (Claire's babysitter is also expecting, so the topic comes up a lot. Today Claire asked me: "do you have a baby in your belly, too?" No, just a few too many bowls of ice cream, Claire.)

    Anyway, I'm still hoping that sometime Josie will share her great gingersnap recipe, but in the meantime, I tried a recipe from Simply recipes.com. I made it pretty much exactly to her instructions, except that I only made half a recipe (in case I didn't like them... though not too much chance of that) and then I rolled them into a (somewhat lumpy) log and then in raw sugar before freezing the log.

    Tonight I cut off several thin roundish cookies and just finished baking them for 8 min. Couldn't be easier, really.

    And... they are really, pretty good! they are thinner than Josie's, but they are crunchy like hers, which is a must for me. I like all my cookies crunchy (feel free to disagree in the comments, I know not everyone agrees!) but especially gingersnaps! I think I still like yours better, Josie, they were a little more substantial, while still crunchy, and I REALLY loved the raw sugar all over yours, instead of just around the edges like these were.

    Maybe sometime there can be a Gingersnap Cookie II post??? :)

    Tuesday, December 29, 2009

    Toffee Making Novel

    I was determined this year to make toffee, for several reasons. First of all, it's so good. Yum! Second, I tried making it years ago and all the butter separated out and it was terrible. I pretty much hate failing at anything, but it has especially bothered me all these years that a simple recipe beat me. It's just a recipe! It shouldn't be that hard! Why didn't it work? What went wrong? Was it the recipe? Was it me?

    So really, this journey to make good toffee is really more about revenge for long ago kitchen grievances even more than just wanting some toffee. Despite discouraging stories from relatives (hi aunt Jane!), I was determined to not let the toffee beat me.

    I scoured the internets looking for recipes and, most importantly, research on the science of toffee and candy making in general. I learned in grad school that if things aren't working right, you better know WHY everything in your experiment (recipe) is there, because only then can you troubleshoot and figure out what ingredient or procedure might be going wrong or tweak things to make them work better. So I was looking for answers to questions like: why do some toffee recipes have corn syrup and others don't? Should you stir toffee as you cook it or not? Why does butter separate out from the sugar? Why is there water in the recipe? What is the scientific molecular structure of a piece of toffee anyway?


    Turns out, sugar chemistry is a $%"@#&, which is why I leave it out of my Cell and Molecular Biology class, and basically people don't know all that much about what's going on scientifically to the molecular structures of the sugar, so I can't share that with you all. I'm sure you're terribly disappointed... (ok, so I didn't look really hard in real scientific sources - it is my vacation, after all and I knew you all wouldn't mind.) But I did find a few helpful websites in my search:


    This guy does seem to be a toffee expert and to know what he's talking about. So I picked up several things from his secret toffee tips: 1) the procedure is just as important as the recipe, 2) age your toffee a week before you eat it for better taste/texture --- easier said than done! and 3) keep your toffee in the refrigerator or freezer. However, I wasn't a fan of his toffee recipe. I didn't feel like trying to find 'soy lecithin' and it annoyed me that you would have to weigh your ingredients. While I don't doubt that it is better to weigh ingredients rather than just measure normally, I don't have a scale at home, just in the lab, and I'm not about to weigh my food on the same lab scale I use for toxic and cancer-causing compounds. Besides, my lab scale only works in metric.


    Knowing a little bit more about what I was going for, but still having no actual recipe, I decided to check a favorite food blog (101 cookbooks) to see if she had ever made toffee. I was in luck! And, not only did she have a recipe for Toasted Pecan Toffee, but she wrote about failing at another try of making toffee also, when she tried to modify the recipe to make it more 'natural.' So this, and a few of the comments convinced me that I should use a recipe with corn syrup - it seemed to be more likely to work. (My old recipe years ago that was a major FAIL did not have corn syrup in it.) I was pretty convinced this was going to be the toffee recipe I tried to make first. But still I didn't feel like I had a good enough grasp on the process of making the toffee, so I kept searching.


    And then I found a baking 911 site dedicated to toffee! It had good answers to most all of my questions and after reading it, I finally felt like I knew what I had to do when making my toffee to make it turn out! I won't repeat all the tips here, but I would strongly suggest you read their site if you give toffee making a try. (Just don't try searching for their 'perfect toffee' recipe - it got moved and it appears to be only available to paying members.)

    A few other clues on the baking 911 site also made me think my 101 cookbooks recipe was a good one - corn syrup and water both seem to be pretty important, as well as using salted butter - good to know! So now I was ready to cook! (finally, I'm sure you're thinking!)


    I still wasn't confident enough in my recipe to toast pecans and go to that work (or worse, waste the nuts) if the toffee didn't turn out, so I decided to make the 101 cookbooks toffee plain.


    So, I melted in a medium saucepan:


    1 c. of butter, cut into pieces

    Then I added:

    1 1/2 c. white granulated sugar

    3 T. corn syrup (Karo brand, though often we have a generic on hand... maybe it matters, maybe not)

    3 T. water

    And then I cooked on medium heat (I have an electric stove), stirring pretty constantly. And stirring slowly, not quickly. I was suprised that the toffee as it was cooking did not boil up very high, I was actually thinking that my pan was going to be too small and I was going to be chipping toffee off my stove, but it didn't boil up very high at all. I used a 'fake' wooden spoon made out of that stuff that looks like plastic but won't melt until it gets to be 500 deg or something crazy like that. (Maybe that matters, maybe not.)


    Here is a picture of the pan and spoon I used:


    It took forever to cook, probably close to an hour of stirring slowly (the second time I made it, I actually timed it and it was about a 30 min process - I guess it just seemed like an hour). The mixture was a little thick and the bubbles sort of looked like lava lamp bubbles, so I wouldn't necessarily recommend doing this while very tired. You might wake up to the smoke detector sounding the alarm of your burnt toffee because you were lulled asleep by the bubbles.


    Finally, it reached 300 deg F and that's when the recipe said it was supposed to be done. So far, so good, it seemed to be all one substance, lacking a distinct pool of liquid butter on top or anything like that. I have a tendency to overcook candy (ask Will about my chunk of teeth-extracting caramel) just because I'm afraid it's not done enough. But this time I just went for it and poured it onto a sheet of waxed paper lining a cookie sheet. I spread it pretty thin (probably a little too thin) and it took up about all the pan (a jelly roll pan, actually.)


    And then I waited for it to cool so I could try it.


    When it finally seemed cool, it still didn't look like any separationg had happened, and when I broke a piece off, it seemed crunchy like toffee is supposed to be...


    And it was good! Yum! I had made edible toffee! Here is a picture:


    I decided to put chocolate on it. Mostly because Will said he'd probably eat more of it if there was chocolate on it. And I didn't want to be the only one eating it in my house (remember - two sticks of butter AND 1 1/2 c. of sugar in there!) Here are pictures of that and of the toffee all broken up:


    Evaluation: it is good! The recipe seemed easy enough and it worked! I probably spread it a little too thin. And yes, it is better several days after making it, at least in Will's opinion. He actually mentioned yesterday that he thought the toffee was better than when I first made it, and he didn't know the secret tip about aging your toffee for a week before eating! I didn't trust my judgement on that issue since I knew it was *supposed* to taste better, so I wasn't an objective evaluator.


    I wanted to try it one more time, though. For two reasons. One, just to make sure it wasn't a fluke that it worked and I'd never be able to get it to work again. And two, because the toffee seemed a little on the light side, colorwise, and I'm wondering if I really should have cooked it just a little longer.


    So today I made it again. This time with toasted pecans, like the 101 cookbooks recipe calls for. (except I only put the chocolate/pecans on one side, not both). It is also very good! Toasted pecans are a good addition. I cooked it to 305 deg F this time, and the color does seem better this time. The "soy lecithin" guy's recipe is to cook to 310-315, so I think I could even go a bit higher without scorching it, but 305 seemed to work fine for me. (*Note: I did NOT test my new $10 digital candy thermometer from Target before using it* I'm not sure why, too lazy I guess - it seemed too much like lab work.)


    Here are a few pictures from today's toffee:
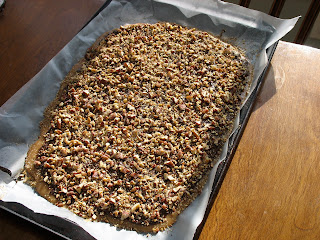


    Don't just take my word for it that it's good. Stop by and I'll give you a piece or two! (see you tomorrow Jane and Laura!)
    If you like toffee and you like candy making and don't mind a half an hour of meditative stirring, I'd encourage you to give toffee a(nother?) try. I'd love to hear about your experiences if you try this recipe.